Thanks for checking out my blog. I have moved over to a new domain at http://www.josiescupcakes.com

Sunday, March 23, 2014
Sunday, March 2, 2014
Wordpress
Hey everyone. I'm working on moving over to a wordpress blog (sorry blogger!). Once that gets all set up I'll get back to regularly posting for you all. Should be up and running be Wednesday at the latest. Until then here are some other ways to follow me:
Twitter
Pinterest
Instagram
Facebook
Youtube
Lots of new stuff coming your way so be sure to check back at josiescupcakes.com later this week. Same address, different host!
Youtube
Lots of new stuff coming your way so be sure to check back at josiescupcakes.com later this week. Same address, different host!
Tuesday, February 25, 2014
How to Assemble a Cupcake Bouquet
 Cupcake bouquets can make a great gift or centerpiece for any occasion. They're a simple to make and also inexpensive. In another post I will go into more detail on how to pipe different kinds of flowers, but for now I will just share with you how to assemble your bouquet.
First off, I have seen so many of these bouquets made with Styrofoam, and with this method I'm going to show you that is not needed. Styrofoam is actually very difficult to work with when creating bouquets because if your cupcake is not dense enough it is easy for them to fall right off the toothpicks. Believe me...I've tried! Another added bonus of not using Styrofoam is it's expensive! The little balls you need to stick in the vases are about $5 each at Walmart.
All you will need to make a bouquet, like the one above, is seven 2 oz. plastic condiment cups, a terracotta vase medium sized, toothpicks, hot glue, and as an option: paint, ribbon, and green tissue paper. The best part of this method is you can use any cupcake you want no matter how moist! Once you gather your supplies it's time to put your beautiful cupcake bouquet together!
INSTRUCTIONS

1. If you would like to decorate your pot, do it now so it dries. I just use the 99 cent craft paint from the store and just sponge paint it on. An ombre effect adds a nice touch and is usually my choice of color, but for this project I just kept it white.
2. Using a sharp knife or scissors to create a small hole in the center of your 2 oz. cups, and poke a toothpick through the hole.

4. Starting around the edge of the pot first, hot glue your cups around the perimeter on an angle facing outwards. This will take six cups. Place the seventh cup in the center gluing it to the other cups. The size of these terracotta vases are a perfect fit for seven 2 oz. cups.
 5. Once the glue is completely dry make sure to remove any of the hot glue strings left over from the cups. You don't want these in your icing!!
6. Last, take your cooled, un-iced, cupcakes and put one into each cup making sure to pierce the cupcake
with the toothpick. The cupcake will stick halfway out the cup, but don't worry, that's why your toothpicks are there for extra support. ***TIP: Wait to ice your cupcakes until they are placed in the bouquet. If you ice them before you will risk ruining your piping because some of the cupcakes will overlap.
7. A few more touches you can add to your bouquet are some ribbon to the pot and green tissue paper in between any gaps for leaves.
As a note, you can use other types of vases/pots (as seen in the last picture) you will just have to play around with the placement of the cups to get a good fit. In the purple vase above I actually had to glue the middle cup off-centered so it was securely attached to the other cups. However, once I piped on the flowers and added some leaves this wasn't noticeable. You will see this more in my video tutorial below.
That being said, watch the video below for my tutorial on how to assemble your cupcake bouquets! Thanks for reading. Please feel free to leave any comments or questions for me below.
Sunday, February 23, 2014
Royal Icing Transfers
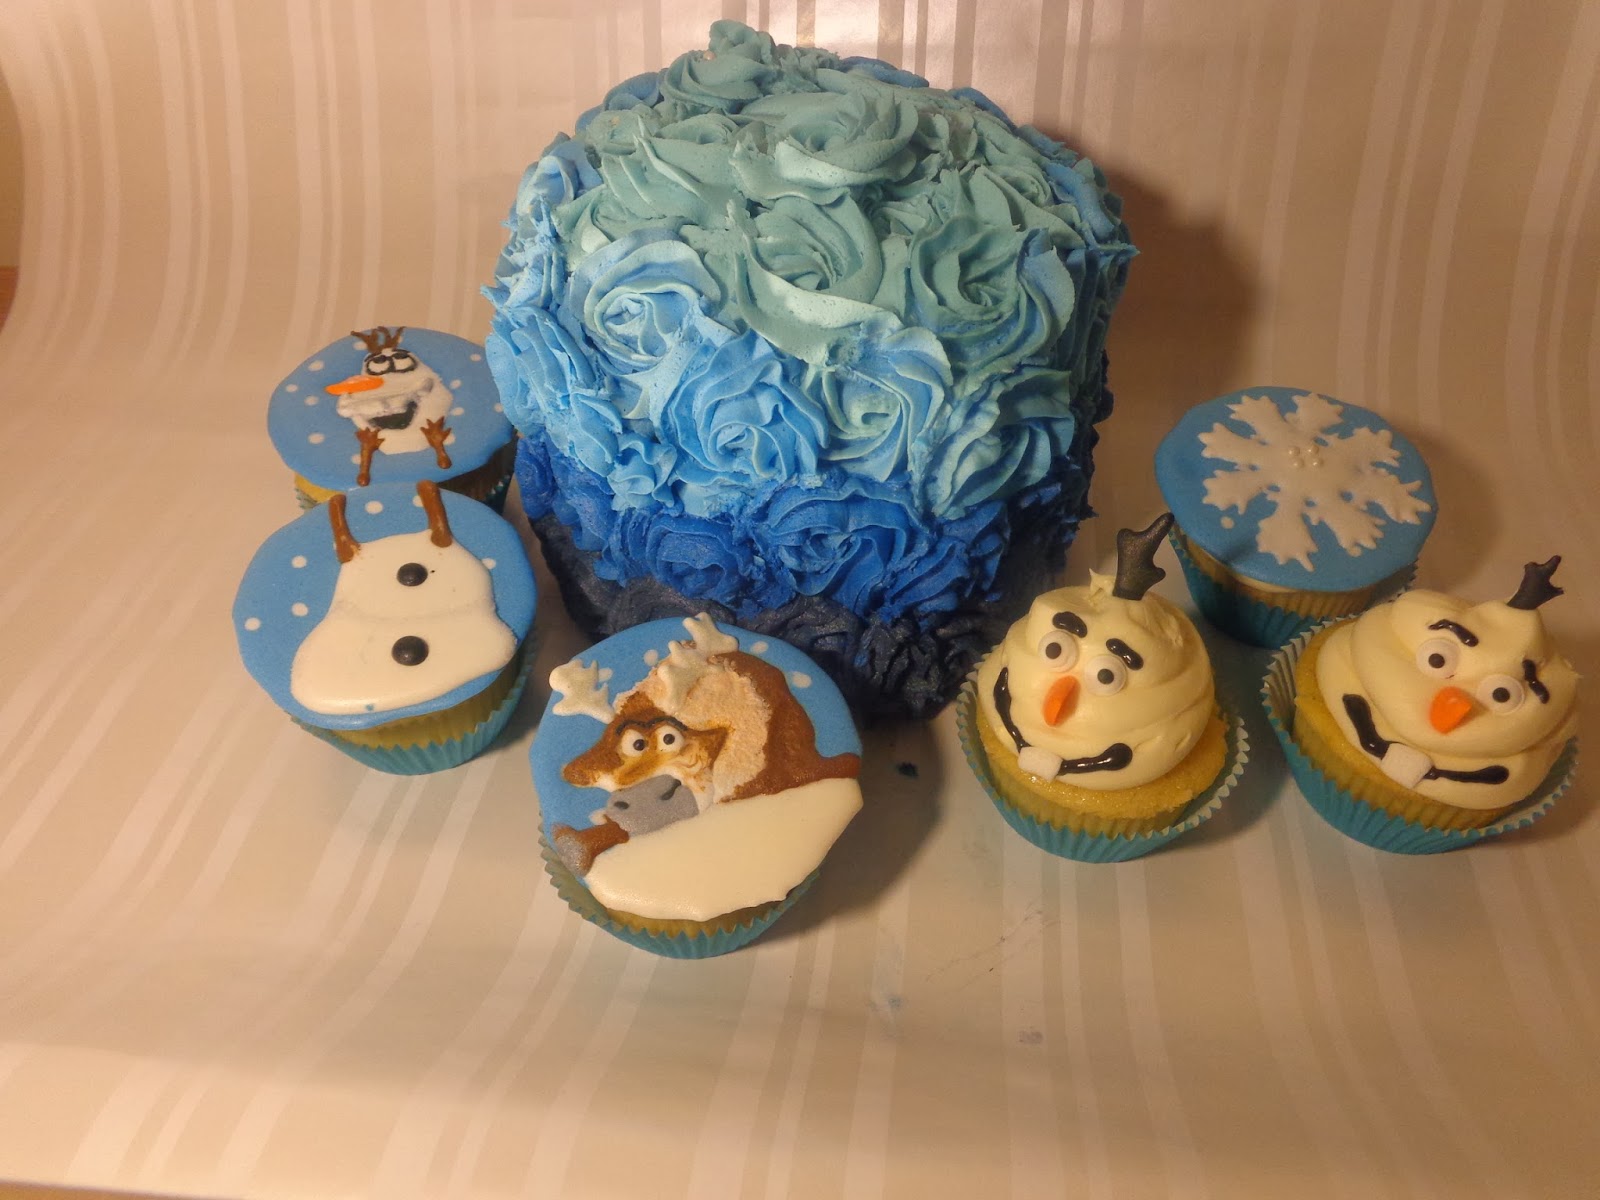

You can also apply these techniques on top of a piece of wax or parchment paper to create a royal icing transfer. These transfers can be placed on top of any plain cupcake to really make it pop. As seen in my Disney's Frozen cupcake tutorial, linked down below, creating a royal icing transfer can be much like painting a picture. Although it is a long process because of the time it takes for royal icing to dry (this can take anywhere from four hours to overnight depending on its thickness), it is not at all difficult for someone to achieve with a steady hand.
 For these Frozen toppers I simply just colored in the template that I hand drew with some royal icing in a piping bag. This same technique can be used for almost any royal icing transfer design. For one design, you can apply wet on wet to achieve such patterns as the snowflakes that you see in the background of these toppers. To create characters, for example Olaf and Sven, you should allow each layer of icing to dry completely to avoid the colors bleeding together. Another tip is to make sure each piece of your design is thick enough so when it is pulled off the wax paper/parchment paper it does not break. Royal icing transfers break easily when peeling off the paper, so always, always, always, make extra.
ICING CONSISTENCIES
Different consistencies of royal icing can also help you create different designs. With the Frozen toppers I used flood consistency, also known as 14 second icing, throughout the entire project. Flood consistency icing is used to fill in large portions because it spreads evenly. To tell if your icing is flood consistency, simply just cut a knife through the icing while in a bowl, and if the line created from the knife in the icing takes about 14 seconds to disappear, you have flood consistency icing. If it takes less time than that, you have added too water, and your icing will be too thin. Outlining consistency is just a bit thicker than flood consistency. This will create borders to your designs and can also be used to make patterns such as lines and dots as seen in these Easter egg cookies by marthastewart.com.
Last is piping icing. This is the thickest royal icing and can be used to make 3D details and transfers. With piping icing you can create flowers, bead work, lace designs, and even more intricate borders and lines.
HOW TO MAKE ROYAL ICING
Royal icing is simple to make and only uses three ingredients: water, powdered sugar, and meringue powder (or two large egg whites).
- Simply mix together two bags of powdered sugar (4lbs) and 3/4 cups of meringue powder (or two large egg whites). Before I add in the water, I whisk together the two powders.
- Although the recipe calls for 1 1/3 cup of water, add in the water a few drops at a time. This will help you get to the right consistency without making your icing too thin. Continue to add water until you get your desired consistency.
- Lastly, as an option, you can add a flavored extract to your liking just be sure it is oil free.
To watch my tutorial on how to make these Frozen royal icing transfer, just click play below. Visit my channel at youtube.com/josiescupcakes for even more videos!
This was a whole lot of information so if you have any questions or comments, please feel free to comment below or e-mail me at josiescupcakes@outlook.com and I'll get back to you as soon as I can!
Tuesday, February 18, 2014
Cupcake Cheat: German Chocolate Cupcakes
I'm going to be posting a series of 'Cupcakes Cheats' because let's face it, sometimes you don't always have the time or supplies to bake from scratch. These recipes will make your cupcakes taste like you spent hours on them when really they don't take much time at all. All of these recipes will involve boxed cake mix with some added ingredients to create some really yummy flavors.

The first 'Cupcake Cheat' I'm going to share with you is definitely a favorite of mine. It's basically a German Chocolate Cake in cupcake form, and I promise these will be a crowd favorite as well.
The first 'Cupcake Cheat' I'm going to share with you is definitely a favorite of mine. It's basically a German Chocolate Cake in cupcake form, and I promise these will be a crowd favorite as well.
INGREDIENTS:CUPCAKES::
Your favorite chocolate cake mix (I prefer Devil's Food cake mix)
Ingredients required for cake mix (Usually 3 eggs, vegetable oil, and water)
INGREDIENTS:TOPPING::
1 cup of sugar
1 cup of evaporated milk
3 egg yolks beaten
1/2 cup of butter
1 1/3 cups of flaked coconut
1 cup of chopped pecans
1 tsp vanilla extract
1/2 bag of mini chocolate chips
INGREDIENTS:GARNISH::
Other 1/2 bag of mini chocolate chips
OTHER SUPPLIES::
2 Ziplock bags
Parchment paper or wax paper
INSTRUCTIONS::
1. Follow directions for box mix and bake your cupcakes. Allow the cupcakes to cool.
2. While the cupcakes are baking make your garnish since these will need time to freeze. Put half a bag of mini chocolate chips into a microwave safe bowl and pop in the microwave for 30 second intervals until melted. Be careful not to burn the chocolate.
3. Pour the melted chocolate into a ziplock bag, cut a small hole at the corner. On top of a baking sheet lay a piece of parchment or wax paper flat and begin piping designs with the melted chocolate. In the photo above you will see I just did zigzags, hearts, loops...whatever you want. Just make sure the designs are thick so they peel off without breaking, and as always make a few extras in case of breakage. Put these in the freezer so they can harden.
4. Use a cupcake corer to make a small hole in the middle of your cupcakes to pour some of your filling into. You can leave this step out if you don't want as much filling.
5. Begin making the filling. In a sauce pan combine the sugar, evaporated milk, butter, and beaten egg yolks. Cook this over low heat and stir constantly until thickened.
6. Remove from heat and add in pecans, coconut, and vanilla. Stir. Let this cool for a bit until thick enough to spread on your cupcakes.
7. Spoon the topping onto each of your cupcake making sure to fill the hole you cored out. Spread this evenly on top of your cupcake with a spatula or butter knife.
8. Melt the other half of your mini chocolate chips in the microwave at 30 second intervals in a microwave safe bowl. Again, put this in a ziplock bag and cut a small hole in the corner. Drizzle the melted chocolate on top of your cupcakes.
9. Wait for the topping to completely cool before adding your garnish or they will melt. You can place the cupcakes in the fridge for a bit if needed. Once cooled, take your chocolate decorations out of the freezer, CAREFULLY peel of the wax/parchment paper, and stick into the top of your cupcakes.
There you have it! Beautiful and delicious cupcakes...from cake mix!
Monday, February 17, 2014
My Favorite Buttercream Frosting Recipe
 As someone who isn't the biggest fan of buttercream frosting, I finally found a recipe that I really enjoy! It's sweet, but doesn't have that lingering taste of butter to it. It's also great for piping which is perfect for the more decorative cupcake. I've been using this for almost all of my cupcakes lately and everyone seems to really enjoy the taste. So today I decided I'm going to spread the love and share with you my favorite buttercream frosting recipe:
INGREDIENTS:
- 1 cup of Crisco shortening
- 1 cup of unsalted butter at room temperature
- 2 lbs of powdered sugar/icing sugar
- 1 tbs of your preferred flavored extract, I use almond extract
- Milk or heavy cream (enough to get the consistency needed)
INSTRUCTIONS:
- Cream together both the shortening and butter until white and fluffy. I begin with my mixer on low speed, scrape down the sides with a spatula, and continue on high speed for about five minutes.
- Slowly add in the powdered sugar about 1 cup at a time again, scrape down the sides as you go until all the powdered sugar is incorporated.
- Add you flavored extract now. You can use less or more than 1 tbs depending on your preference.
- Add in your milk or heavy cream. Pour in a little at a time, mix, until you get the consistency needed for your project. If you're piping details you will need a thicker consistency. (IE. For the frosting in the flower above I only used about 2 tbs of milk.)
***Tip: Instead of using a flavored extract, try a flavored coffee creamer in place of the milk. This adds that little pop of flavor without the extra ingredient.
My name isn't Josie....

My name isn't Josie. Josie is the nickname of my Nana who inspired me to work towards this dream of mine to one day own my own cupcake shop. She was an incredible baker and the strongest woman I have ever know, and so comes the name, "Josie's Cupcakes".
My name is Laura, and on this blog you will find my cupcake creations, recipes, tutorials, tips, and more. Thanks for reading. I hope you enjoy!
Subscribe to:
Comments (Atom)